LMS Quizzes (timer or no timer) as off-campus digital open book exams
This guide and checklist are for academic staff who have nominated with the Exams Office to have an online unsupervised open-book quiz in the LMS as their final assessment.
To understand more about quizzes, see using LMS Quizzes (timer or no timer) as off-campus digital open book exams.
This guide provides information on setting up quiz-based open-book exams that are within strict time limits.
Checklist
Complete this checklist to get your exam ready for your students:
If there are any concerns or questions with the below guide please contact exam support.
Staff can pre-prepare questions and content for their quiz while the Exam Portal automated quiz creation is pending by using the Question Bank option outlined below.
Automation if you used the Exams Portal
If you supplied the details of your exam to the Exams Office via the Exams Office Portal then an Assignment Group and quiz will be automatically entered into your LMS subject with pre-set settings from the Exams Office. For more information, please see exam key dates.
From the information in the Exam Portal, the exam timetable will be created to minimise clashes for students and to balance, where possible, the assessment load for all students across the examination period.
ACTION: Please follow the below steps to familiarise yourself with the created quiz template and to complete the action items (labelled ACTION) required of you to complete the quiz configuration.
Step one
An Assignment Group called Semester 2 exams, 2023 with 0% weighting will be created in your subject, and a quiz will be created and allocated to this group
ACTION: Please update this weighting to reflect the correct weighting for the exam
Step two
The integration automatically adds exceptions for students who have alternative exam arrangements (AEAs), including extended time limits or different availability times.
Students with extra time to complete the exam will be listed under the Assign to settings and Moderate This Quiz button, visible when viewing the published quiz, and as additional calendar entries for each student in the instructors' calendar view.
Please do not alter these exceptions!
Exceptions are automatically managed via the integration with the Exams Portal, and variations and further exceptions may be created up to the exam’s scheduled time as students’ needs are processed and addressed. Please do not edit these settings. If you feel changes are needed, please contact Exams Support to discuss.
Step three
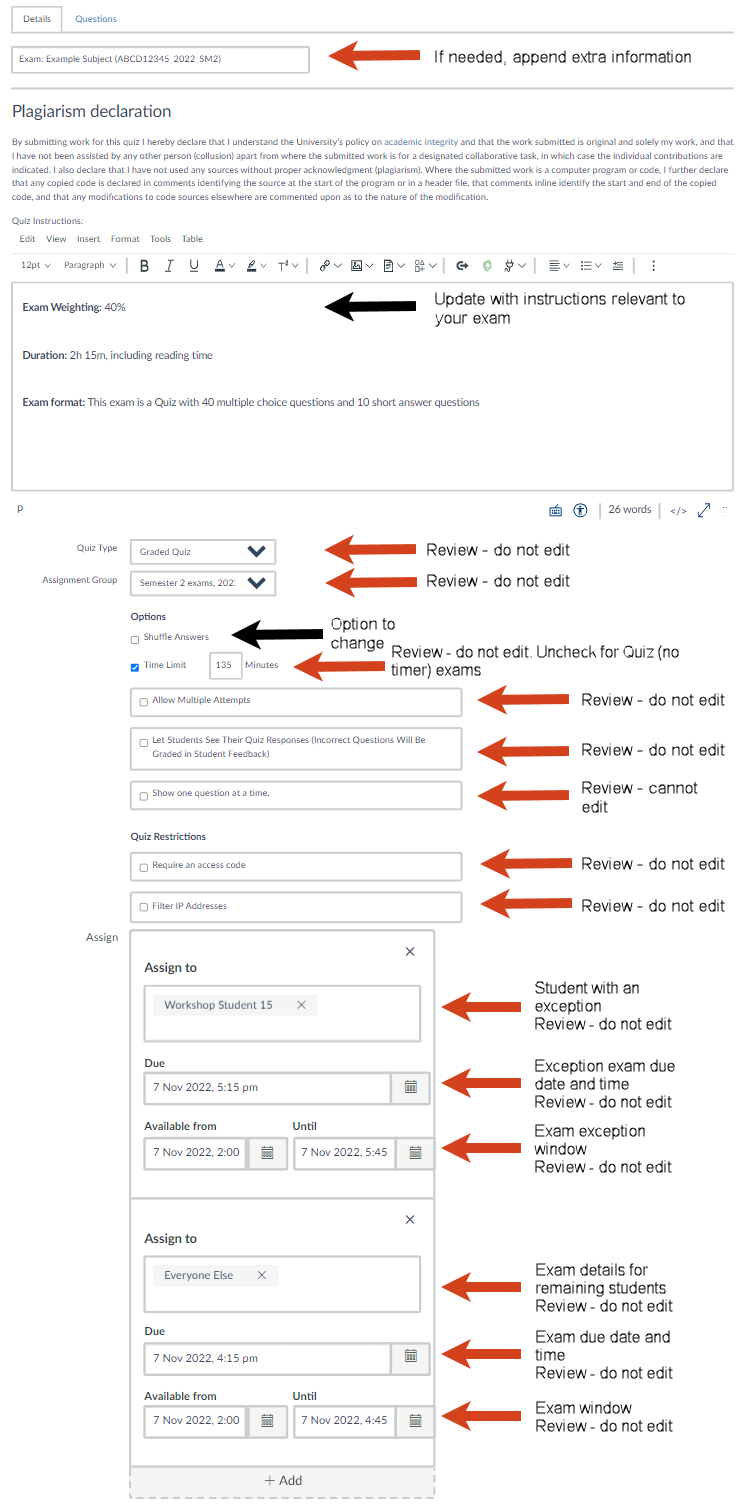
The quiz settings are automatically pre-set from the Exams Office integration as per the screenshots below. DO NOT CHANGE THESE SETTINGS unless the guide below indicates you can. If you have any concerns with the settings, contact Exams Support to discuss.
-
Exam setting explained
- Quiz name: The name of the exam – format is ‘Exam: exam name in portal (subject code)’. If needed for clarification, append any extra information such as 'Part A'
- Quiz instructions: This will be populated with the plagiarism declaration statement to ensure students see this statement when viewing the quiz from a mobile device
- ACTION: Below the Academic Integrity Declaration, please update the quiz instructions with relevant information for your particular exam.
- Quiz Type: Graded Quiz
- Assignment Group: Semester 2 exams, 2023
- Shuffle Answers: Unchecked
- OPTIONAL ACTION: You can change this if you wish, but consider how you will answer queries about individual questions – if a student says "there is a problem with Question 5", you will not know the order in which their multiple-choice options appear.
- Time Limit:
- Timer: Checked, and the exam length entered in the minutes box – for example, 120 minutes
- No timer: Unchecked. Note: It is recommended to use Quiz (no timer) if the exam contains scanning and/or file upload submissions.
- Allow Multiple Attempts: Unchecked
- Let Students See Their Quiz Responses (Incorrect Questions Will Be Graded in Student Feedback): Unchecked
- Show one question at a time: Unchecked. As per the advice from the Semester 1 2020 Assessment Review, this setting is locked and you are unable to change it.
- Require an access code: Unchecked
- Filter IP Addresses: Unchecked
- Assign to: Everyone
- Note: This may say Everyone else if some students have exam exceptions. Exceptions will be listed as additional Assign to settings.
- Due date: populated with the scheduled finish date and time for the exam includes reading time and exam time selected in the exam portal
- Available from date: populated with the date and time from which the student can access the exam
- Available until date: populated with the due date plus 30 minutes
- The quiz will be Published.
In the LMS, students will see the quiz as scheduled in the Assignments section, the Grades section and as a Calendar item with the due date. They will not be able to open the quiz or read the description until the Available from date and time passes.
Adding questions and content to your exam quiz
With the quiz created via the automated integration with the Exams Office as above and following the required checks you need to make to those settings, you will finally need to set up the questions to be added to the quiz.
-
Option one: Create questions directly in the exam quiz
To enter quiz questions directly into the quiz:
- Click on Quizzes in the subject menu.
- Click on the exam quiz.
- Click Edit.
- Click on the Questions tab at the top.
- Click + New Question.
- From the drop-down next to Question, select the type of question you wish to create.
- Update the pts: box with the points value of the question.
- Write your question in the Question Text box, including adding any links, files, images or media needed for the question.
- Follow the steps to create the question type you have selected. See this guide for a description of each question type.
- Note: As this is an exam, entering feedback to students is not needed.
- IMPORTANT: Click Update Question. A common error is to miss this step, if you do you will lose your work.
- Click + New Question to create your next question and repeat until all the question are created.
- Click Save when you are finished.
-
Option two: Create questions in a Question Bank (recommended)
It is recommended that you consider using a Question Bank as this helps with management and movement of the questions for an exam as a group should that be needed.
- You can do this by clicking on Quizzes in the subject menu, then clicking on the vertical ellipses (three dot) menu in the top right of the Quizzes page.
- From here, select Manage Question Banks, then +Add Question Bank.
- Enter a name for the question bank, for example Exam SM2 2023, and press Return on your keyboard to save.
- Now click on the name of the question bank that you have just created and click the +Add a Question button on the right.
- From the drop-down next to Question, select the type of question you wish to create.
- Update the pts: box with the points value of the question.
- Write your question in the Question Text box, including adding any links, files, images or media needed for the question.
- Follow the steps to create the question type you have selected. See this guide for a description of each question type.
- Note: As this is an exam, entering feedback to students is not needed.
- IMPORTANT: Click Update Question – a common error is to miss this step, if you do you will lose your work.
- Click + New Question to create your next question and repeat until all the question are created.
- Once you have added all your questions to the question bank, attach it to the quiz. See How do I create a quiz with a question group linked to a question bank?
NOTE: To ensure that students' accessibility needs are met:
- Provide students with Word format documents. Avoid PDF files.
- Ensure any images you add to the quiz have alt text added to them. For more information see how do I manage alt text?
-
Option three: Process for creating quiz questions amongst a restricted group (not viewable by all staff or tutors in the subject)
If there are multiple staff members in a subject and you wish to limit the number of staff who can see the exam before it is released to students, we suggest the following workflow:
- First set up an example online exam quiz in your Playpen subject.
- Add the exam questions to a private Question Bank. You can do this by clicking on Quizzes in the subject menu, then clicking on the vertical ellipses (three dot) menu in the top right of the quizzes page.
- From here, select Manage Question Banks, then +Add Question Bank.
- Enter a name for the question bank, for example Exam SM2 2023, and press Return on your keyboard to save.
- In the Manage question bank page, bookmark the question bank by clicking on the bookmark icon.
- Now click on the name of the question bank that you have just created, and click the Add a Question button.
- From the drop-down next to Question, select the type of question you wish to create.
- Update the pts: box with the points value of the question.
- Write your question in the Question Text box, including adding any links, files, images or media needed for the question.
- Follow the steps to create the question type you have selected. See this guide for a description of each question type.
- Note: As this is an exam, entering feedback to students is not needed.
- IMPORTANT: Click Update Question – a common error is to miss this step, if you do you will lose your work.
- Click + New Question to create your next question and repeat until all the question are created.
- Once you have added all your questions to the question bank, attach it to the quiz in your Playpen subject.
- Add your exam collaborators to your Playpen subject to work on/verify the questions. See how do I create a quiz with a question group linked to a question bank?
- Your quiz can be built in your subject LMS site from the bookmarked question bank closer to the exam time.
The below guides may assist with this process:
- Import quiz tool information (for quizzes with no question banks)
- Copying quizzes to other LMS subjects
If you have created a complex quiz with multiple question banks, please contact Exams Support for assistance with moving your quiz from your Playpen subject to the quiz exam shell.
NOTE: To ensure that students' accessibility needs are met:
- Provide students with Word format documents. Avoid PDF files.
- Ensure any images you add to the quiz have alt text added to them. For more information see how do I manage alt text?
Preparing students for the online exam
Practice exam
We strongly recommend that you conduct a practice LMS exam quiz with your students prior to the exam period. This will enable students to become familiar with the process, give them the opportunity to address any technical difficulties, and allow them to test whether their internet connection is suitable to complete the exam. It will also give students exposure to the type of exam questions that are asked in open book exams.
Exam timing in a quiz
- 'Available From' date and time to 'Due' date and time
-
Time limit includes:
- Reading time (15 mins or 30 mins)
- Exam time selected (1 hour, 1 hour and 30 minutes, 2 hours or 3 hours).
Extra submission time:
- No extra time is given. Attempts are automatically submitted after time limit reached.
Example settings for LMS Quiz exam (timer)
| Time limit: 135 minutes | Includes reading and exam time. |
| Available from: Nov 7 2:00pm | Exam is made available to students. |
| Due: Nov 7 4:15pm | Exam attempts are due. The duration between Available from and Due should match the Time limit set in the quiz. Once the Time limit has been reached, the student attempt will be automatically submitted for grading. Attempts submitted between the Due date and the Until date will be recorded as Late. |
| Until: Nov 7 4:45pm | Latest time student can submit. Any open attempt will be automatically submitted. |
Exam timing in a Quiz (no timer)
- 'Available From' date and time to 'Due' date and time
-
Includes:
- Reading time (15 mins or 30 mins)
- Exam time (1 hour, 1 hour and 30 minutes, 2 hours or 3 hours).
- 'Due' date and time to 'Until' date and time
-
Includes:
- Exam Submission time – 30 minutes (submission will be identified as late).
- After 'Until' date and time
-
Student submission is closed.
Staff resources
For guides on creating quiz questions and setting up question banks:
- Guides for each question type
- How do I create a question bank in a course (subject)?
- How do I create a quiz with a question group linked to a question bank?
- How do I create a quiz by finding questions in a question bank?
- How do I add a rubric to a quiz?
- Guide to check when students can see their marks and feedback is configured as desired
- Import quiz content tool guide
- Copying quizzes to other LMS subjects.
Workshops on LMS Quizzes are regularly available from Learning Environments.
For advice on writing questions for open book exams read assessment considerations in moving from closed book to open book exams.
For support on setting up your exam please contact Exams Support.
This page was last updated on 11 Apr 2024.
Please report any errors on this page to our website maintainers