Record and edit a narrated slideshow presentation using Universal Capture
Whether we like it or not, PowerPoint is a huge part of academic presentation culture. At its simplest, PowerPoint was created as an easy tool to create and display visual aids. These could be images, graphs, diagrams, info-graphics, text, animations, or any combination of the above. Narrated slide shows are best reserved for static visual content like collections of photographs, a series of diagrams, or sets of data visualisations.
Hardware
Whether you’re planning a series of audio podcasts, want to record a quick video message with your webcam, or provide a narrated slideshow, it always pays to record a quick sound test. to test the quality of your microphone. See how to find a good microphone on video and audio - recording, editing and uploading.
You will also need a laptop, desktop or tablet computer.
Software
Any desktop presentation software that can run a full-screen slide show can be used to record a narrated slideshow, so choose the software you are most familiar with. For this demonstration, we'll be using Microsoft PowerPoint to make our presentation.
We recommend using slides in 16x9 (widescreen) format for your slides, and we encourage you to use high quality photos and illustrations that are cited according to the University's copyright guidelines. You can download a 16x9 University slide template from the University's Brand Hub website: Select 'PowerPoint presentation with copyright notice for teaching purposes, 16x9 version'.
For recording and editing video there is a variety of software options available.
In this step-by-step guide we are using Echo360 Universal Capture (previously known as Personal Capture) as it can be accessed through the LMS and will be familiar to many users. It is available to all staff by logging into Lecture Capture itself or from the Self Service portal for Macs or Software Centre for Windows.
Students can also download audio or video files through the Echo360 app and access them offline, thus reducing disruptions due to bandwidth and latency issues.
Step-by-step guide
- Find a quiet place to record.
- Plug in your choice of microphone.
- If you haven’t already, install Universal Capture on your computer.
- Open the Echo360 Universal Capture app and log in with your University of Melbourne account credentials.
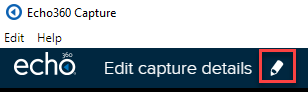
- Click the pencil icon next to the Edit capture details text on the top bar.
- Enter a Title and a Description for your message.
- Under Publish To... select the subject you wish to publish the file to. Alternatively you can publish to your Echo360 Library and share it to your subject later.
- Click Save.

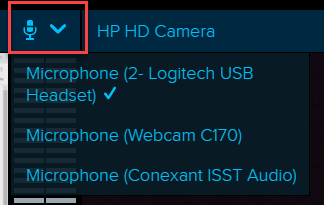
- Click the dropdown menu next to the microphone icon and make sure your the correct microphone is selected.
- Ensure your web cam is switched off and the Screen Capture option is switched on using the drop-down menu on either side of the audio levels meter (the green bars in the middle of the screen).

- Before you click Record, speak into the microphone and check the audio levels (the green bars in the middle of the screen) are bouncing up and down and peaking around the 75% mark. If your mic is too loud or too quiet, you can either adjust the distance between the mic and your mouth, or adjust the microphone audio levels on your computer operating system (instructions for Mac and PC).
- Next, open your PowerPoint presentation in full screen mode. If you have two monitors, you may need to open PowerPoint > Preferences > Slideshow and deselect Always start Presenter view with two displays to make the slides appear full screen on your desktop.
- Go back to Echo and click the large red Recording button to start the recording, then minimise the Echo app and record your presentation.

- You can pause, complete or cancel the recording at any time using the buttons on screen. Click the square stop button when you’ve finished recording your video message.

- The video recording will automatically begin uploading to Echo.
- When the upload is complete, click on Click to View to follow the link to view the video recording on the Echo website. If you have any difficulties you can log onto Lecture Capture and locate your upload either in My Content or your selected subject, then click on it.
- To make a quick and simple edits, click on the Media Icon and select Edit media and follow the on screen instructions to trim, top, tail or delete the unwanted section of media. See guide edit a video previously recorded by Lecture Capture.
- If you want to make more extensive edits, consider downloading the media from Echo and working on it on the desktop using a free editor like OpenShot, then re-upload the video to Echo.
- To share your video file with your subject you have the below options:
- If you selected to Publish your video file straight to your subject, it will already be available to students in the Lecture Capture link on the subject menu.
- If you uploaded the video file to your Library you can use the Share button to share it to the Lecture Capture link in your subject by clicking on Class and selecting the Subject you wish to share the video too.
- If you wish to embed the narrated slideshow presentation on an LMS Page or in an Announcement (note this can only be done with Lecture Captures sitting in your My Content/Library). See guide embed a Lecture Capture recording in your LMS page.
- Click Edit on your Page or Announcement
- Click the Apps button on the far right of the tool bar
- Scroll down to Lecture Capture and click on it
- Find and select your narrated slideshow presentation
- Click Insert and then Save.
Supporting resources
- For recommended hardware and software, see video and audio - recording, editing and uploading.
- See the Learning Environments web page on advice and support for staff moving to online teaching, learning and assessment for detailed information and supporting resources.
- Lecture Capture guides.
This page was last updated on 19 Apr 2023.
Please report any errors on this page to our website maintainers